Welcome to the Digital Photography Academy! This site offers some tips and techniques to improve one's photography skills and some creative ways to manipulate pictures and shooting styles. For a start, feel free to look at the terminology guide.
Subscribe in a Digital Photography Academy

Recent updates

Showing posts with label Portrait. Show all posts

Wednesday, July 22, 2009

15 tips for portrait photography

Taking portrait can be quite fun. If you fret over how to take a good portrait shot, read the rest of the article to give you some insight on portrait photography.

1. Use low aperture
If you find a clean background and you want to emphasize more on the people, you can try to use wide aperture len such as f/2.8. Doing so allows you to blur your background while making your subject stays sharp.


Image by BobMacMillan

2. Use longer focal length
You can’t take subject with a wide angle len as wide angle will distort their face. Most portraits are done using 50mm or above. Using longer focal length will produce a nice bokeh. You can try to alter the shape of the bokeh by placing a cut shape cardboard on the front element of the len.


3. Use reflector if you have any
If you find that you are under the sun, and you want to use it as the backlight, you are bound to have an underexposed subject. If you have a reflector with you, you can use it to direct the sunlight from the background and use it to lit your subject face. Use the reflector if you wish to minimise the amount of shadow on the face such as under the nose and the eyes.


Image by Bahman Farzad

4. Use fill-in flash
If you find that your subject is poorly lit, either they are backlit or there is not enough available light, you can try to use flash to fill in. Fill-in flash is a good way to eliminate shadow on the face and allow you to get a proper exposed picture. Take note not to use a high power flash as this will blow out your picture completely.


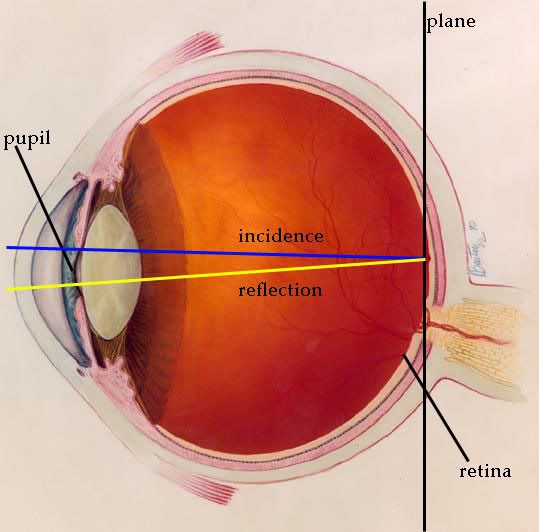
5. Try creating catchlight on the subject eyes
Having a catchlight in the subject eyes can create a powerful impact to any portrait photography. Catchlight is a reflection off the surface of the eyes and comes in all shapes and sizes. You can use various tools to help you create catchlight such as using a reflector, flash, umbrellas, softbox or any available light that you can use.


Image by Bahman Farzad

6. Choose your background carefully
It is always good to choose a good background that you can match with the subject’s personality and clothing. This will enable the subject to stand out from the background. If your background is too messy, the viewers will be distracted by it. Any distracting element such as lines and people passing by should be avoided.


Image by Stefan Tell

7. Try different angle
Most portrait shot are done at eye level. It can be quite boring sometime if you keep shooting the same angle. Try experimenting with different angles such as taking portrait at high level or low level. You will be amazed to get an unexpected result.


8. Focusing
It is not necessary to get your subject in focus every time. You can focus on the foreground while blurring the subject to create an element of mystery to leave the viewer to wonder how the subject looks.


Image by Cartocci

9. Shoot candid
If you find that your subject is uncomfortable taking pictures, why not ask them to do something? I personally find that the most natural way of taking portrait is when they least expect you to take pictures of them. Try engaging them in conversation and make them relax and when the moment arrives where they are too engrossed, shoot them and you will have a natural portrait shot.


Image by briantmurphy

10. Try different lighting
You can shoot portrait in different lighting condition. Having lighting lit on certain part of the body can create depth, mystery and mood of the picture. Try playing with different light set up and you can get unexpected result.


Image by omar
11. Gives your subject some room
When you want to take a person looking at elsewhere, always frame the picture in such a way there is a extra space at the direction they are looking. This makes the viewer curious what is the person looking at.


Image by Jevaun
12. Do selective colorization
Selective colorization simply means getting certain parts of the photo while making the rest of photo black and white. This type of technique is useful when you want to guide the viewers to the point of interest. Selective colorization can be achieved using photoshop.


Image by Furryscaly

13. Try different posing
If your subject has some experience in posing, you can get them to pose whatever you want them to. Try a variety of combination such as different facial expression, positioning of hands, legs and body.


14. Give them prop to play around with
If you find that you have exhausted all the possibility of posing, give your subject a prop and ask them to play with it. By doing so, not only they will be restricted to the posing you required them but the shots that you took will be more candid. Introducing a prop will create a new point of interest which will add on to the theme that you are doing.


Image by evaxebra
15. Conceal part of the subject
Portrait does not mean you must always take the person looking at you or with features of the person seen. Sometime it is good to hide some part of the person features to let viewers have a little imagination to focus on some part of the body that you want them to.


Image by dajiang1999

What have I missed? This should be more than enough for you to play around with. I will continue to add on if I find any pictures to share with.
Read more!

Thursday, July 2, 2009

Using Photoshop to remove red eyes effect

Red eyes effect is commonly found image taken by compact camera. There are few causes of red eyes:

1. The flash is beside the len which is common in compact camera.
2. Red eyes reduction is not on in camera.
3. The subject is on the poorly lit environment thus the eyes dilates. Using a flash at this condition will have a high chance of getting red eyes.

red eyes effect photoshopred eyes effect photoshopThere are ways to prevent red eyes but not necessary foolproof. As such, there maybe times where you need to open your Photoshop to take away the red eyes effect. In this tutorial, Adobe Photoshop CS3 will be used to eliminate red eyes effect.

1. Select colour replacement tool.
2. Select the appropriate brush size and set hardness to 100%.
3. Select colour.
4. Select tolerance to 100%.
5. Paint over the red eyes.

red eyes effect photoshop


6. Because of the colour replacement tool, the red eyes will be converted to grey. You will still need to darken those grey eyes. So select the burn tool.
7. Adjust brush size.
8. Set to shadow.
9. Set exposure to 100%.
10. Colour over the grey eyes.

red eyes effect photoshop


11. Finished!!

red eyes effect photoshop
Read more!

Wednesday, July 1, 2009

5 tips to prevent red eyes

Red eyes effect is caused by light bouncing off the retina. The red colour actually is a reflection from the blood vessels found inside of the red eyes, hence the red eyes effect. Usually, it happens in poorly lit environment and the size of the pupils dilates to allow us to see better. When that happens, if a flash is fired at the eyes, and also there is a law of reflection that states that the angle of reflection is equal to angle of incidence (where the light is coming from), there is a high chance that the light reflected back to the camera will be red.

red eyes effectIf you can change the angle of the flash such that there is no reflection bouncing off the retina and to make the size of the pupils smaller, then you will not get a red eyes effect.

1. Use the red eyes reduction found on your camera

Most cameras have this feature which allows you to reduce the red eyes. Although not 100% foolproof, it comes in handy as you can minimise the effect of red eyes. Red eyes reduction does by firing a pre-flash light before firing a main flash to the subject. The theory is that by firing a pre-flash light, the size of the pupils become small, thus fewer chances for the light to bounce off the retina when the main flash fires.

2. Move to an area with more ambient light

When you move your subject to a more ambient light, the size of pupils will become small as there is sufficient light to enter into the eyes. This will help us see better as well as reducing the need to use flash as there is more light to be captured by the camera.

3. Ask the subject to look at light source

If you find that the area is poorly lit and there is a lamp post available, ask them to look at the lamp post. This will help to reduce red eyes as the size of your subject' pupils will become small.

4. Use photoshop tools to correct red eyes

If you find that there is still red eyes visible, this could be due to some people have larger pupils than the other, you should use photoshop to remove the red eyes.

5. Mount an external flash

As explained earlier about the law of reflection, if you can change the angle of light source such that the angle of reflection goes the opposite way rather than bouncing off the surface of the retina, red eyes effect will not occur. Unfortunately, most compact cameras flash sit beside the len and there is no way you can move you flash. In this case, you can try to use red eyes reduction or you can photoshop to remove them. All digital SLR allow external flash to be mounted on top via hotshoe. Thus, the angle can be changed such that you can minimize the effect of red eyes.

I hope these tips will help you to reduce red eyes!!!
Read more!

Monday, June 29, 2009

Basic studio photography tips

If you are new in studio photography, you might have a lot of questions that is popping out in your mind:

1. How to get the best photo in studio?
2. What is it important to get a correct white balance?
3. How to choose the right equipment to use in studio?
4. How to position the light so as to get a natural looking portrait?

Here is the video by Rob Mitchell who has 15 years in fashion photography. He is going to use video to teach how to introduce some tips on photo studio.

Read more!

5 basic tips to pose a model

Posing for a model can be quite a challenging task to do. But once to you have experienced in handling models, you will be able to direct model to whatever poses that suit your theme. It will be better if the models are experienced and there will be little guidance and directions to give to them. What if the models are inexperienced? Then you will have to guide them in posing so as to achieve what you want in your pictures. There are some books you can use to refer to and here are some general tips that you can follow:

photography posing techniquesphotography posing techniquesphotography posing techniquesphotography posing techniques

1. Don’t hold your breath for a pose but hold in your stomach so that you will give a more toned appearance to the abdomen. Keep you back straight and your shoulder up if you are portraying a casual look.

2. Bend your arms to make the pose look natural. Don’t keep them entirely straight unless you are told to do so. Do the same things for the legs. Do not do the same placement in both arms and legs. If you have one hand on the waist, try to hang your the other hand.

3. Do not always look straight at the camera. Instead, try to turn your head at different angle and different eyes positions. Try to tilt your head or look somewhere for some poses.

4. Try a different variety of expression such as anger, laugh, and stare, to give colour to your poses. This is especially helpful since the expression will contribute to the mood of the pictures.
Instead of resting your weight on both feet, try to shift most of your weight on one foot. Doing so will make it look natural and gives a slimming effect in most positions. Keep your chin up to avoid chin wrinkles or double chins.

Photography Posing Secret5. Last but not least if you find that you are having problem getting the model to pose, the simplest thing to do is to tell them to “act”. By getting them to do something, the model may get to do something that are natural and can make them less stiff. For example, if you have a model that acts as a doctor, you can tell the model to listen to his patient heartbeat. In this way, the model will be focused on what he/she is doing rather than posing. It will result in a more natural posing as opposed to “forced posing”. Another way of getting to do it is to ask the model to do something and then when the model is about to do something that you want, you can just tell them to freeze the action and take the pictures. Of course, this method will give you what you want but will place the model in an awkward position. I will prefer the former way as it will produce better result of capturing the posture but it will take some practice as timing is an issue.

To better understand how to do posing, below are some videos that you can watch.These videos are by Katharin Dombrow. She will show you the basic of posing techniques.


Read more!